makeup
BEAUTY FOCUS: WET SHADOW
A pop of purple on the lid brightens the face and is a soft way to make a bold statement. And it’s especially beautiful when paired with a peach cheek and lip. But the real focus of this video tutorial is to demonstrate the simple technique of wetting eye shadow with water for more intensity and lasting power.
TOOLS
Purple mineral loose shadow, purple pressed shadow, laydown shadow brush, blending shadow brush, black kohl or kajal liner, black volumizing mascara, foundation, sponge, peach cream blush, foundation brush, peach lip color.
1. Start by evening out your skin tone using foundation and a sponge. Here we’re using a cream foundation stick and an egg-shaped sponge, but you can use whatever you feel comfortable with.
2. Dampen your brush with water and dip it into the purple loose shadow to make a paste. You might have to go back in the water for a double dip if the consisentency is too powdery, or back into the powder if it’s too watery. Then smooth out any clumps on the back of your hand before you apply it to your eye lids.
3. Sweep the shadow along your upper and lower lids. Smooth out any edges with your fingers.
4. Load up your brush with the dry pressed shadow and sweep it back over the lids to set it. I prefer a purple shimmer shadow but you can certainly use a matte one.
5. Rim your inner waterline with a black kohl liner by gently pulling down on your eyelid with your finger then tracing the pencil back and forth.
6. Coat your lashes with two coats of mascara.
7. Using a foundation brush, pat a peach cream blush on the apples of your cheeks. You can find exactly where the apples of your cheeks are by smiling in a mirror. Again, blend any edges with your fingers or the sponge.
8. Finish the look with a peach lip color.
XO Amy Nadine
hair
makeup
FALL FOR THIS
Fall fashion is finally here and as we store away our jean cut-offs and bikinis, we have the chance to change up our makeup a little too. All my life I’ve always passed over lip colors in the brick/brown/rust/pumpkin family because they just didn’t seem pretty to me or like they’d do anything for me or my clients. What a closed mind I had! They don’t just look gorgeous on redheads, they look good on everyone, especially as we lose our summer tans. You just have to broaden your concept as to what you’ve always thought was pretty and give it a try; because it’s a very sophisticated look when you’re ready to see yourself that way.
You can go soft with a rusty nude or caramel or go bold with a deep orange. I would suggest pairing it with a simple eye… a bone or wheat shadow and black mascara complement it beautifully.
XO Amy Nadine
You can go soft with a rusty nude or caramel or go bold with a deep orange. I would suggest pairing it with a simple eye… a bone or wheat shadow and black mascara complement it beautifully.
XO Amy Nadine
inspirations
PICTURE THIS
A lot of you ladies have been writing in and asking what is the best way to communicate with your stylist about what you would like done with your hair. This is especially important if you are making a drastic change. We suggest that you always bring at least one photo in with you because pictures are a universal language. Want to go shorter? Change up your color? Try out bangs? Then get online and print out some photos or start flipping through magazines. When your hair stylist has only “sort of reddish – brownish, but not too dark. Ya know?” to go off of then things can easily get lost in translation. So reduce confusion on your next visit to the salon and bring along a visual.
XO Lauren
XO Lauren
hair
DON’T BE SCARED!
Halloween is coming up quick! That means you need to start thinking about your costumes (if you haven’t already). Hopefully I can help simplify the hair part because I’m going to do some tutorials on halloween hair do’s! What hair styles do you guys want to learn to go with your costumes? 20′s hair? 40′s hair? Crazy curls? Mermaid hair? Tweet us, Facebook us or email me at ke@thebeautydepartment.com! I’m going to pick my favorite 4 looks and put some step-by-step photos together for you guys. So tell me… what are you going to be???
Xx Kristin
Xx Kristin
makeup
A QUARTET OF LINERS
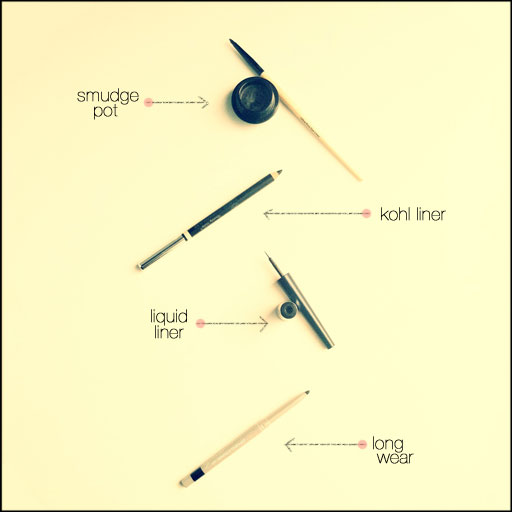
Decisions decisions… there are so many options out there nowadays when it comes to lining our eyes, which is so great, but can be a little overwhelming too. Hopefully this will help a lot to find the right type, even though you don’t have to pick just one (I personally could never give up using the other three!). All four can be found at your local drug store, beauty supply or department store.
KOHL LINER: This is the original classic. It glides on with ease and now comes in metallic finishes as well as matte solids. Because of their consistency, kohl pencils are amazing for smudging with your finger or a cotton swab, creating less of a “line” and more of frame. Try to really get in there between the lashes and even into your waterline for a more piercing look. Choose this type for the expansive color options, a softer look, blendability and as the only liner type that is truly safe to rim your inner waterline. ** Tip: for a thin line, use the point of the pencil, holding it almost perpendicularly (90-degree angle) to your eye. For a thicker line, slant the pencil to a 45-degree angle, using more of the side of the tip of the pencil. Don’t be afraid to try holding your pencil at different angles — make-up is temporary and you can wipe it off and try again as many times as it takes for you to get the hang of it. Also, you can adjust the width by how much you sharpen the pencil, so for more precise lines, sharpen it as far as you can to create a true point, and for more of a smoked line, heat up the tip with a quick blast from your blow dryer then dull the point on the back of your hand.
LONGWEAR LINER: These liners are newer to the cosmetic world but almost every brand has caught up and offers one now. They are usually self-sharpening and turn up from the bottom, so you don’t have control over how how sharp/dull the tip is, but in return, you get a defined eye that once set, won’t bleed, run or fade and will last for hours (hallelujah!). Like the kohl pencil, you’ll want to gently lift your upper lid up with your ring finger first to have greater access to your actual lash line, then drag the pencil back and forth in between your lashes. Once you’ve covered that area, go a little higher and line right above your lashes like you would with a typical liner then again along your bottom lash line if you so desire. You have 30 seconds or so to blend and smooth over the line to make sure it’s not jagged before it sets for the day.
LIQUID LINER: Liquid liners are the most intense and precise way to line your eyes with a straight line or to wing the line into a cat eye. Because the formula dries within five seconds, there isn’t a lot of room for error and this turns a lot of us away from even attempting it. But I promise you, like anything else that’s new and scary, if you just go for it and practice, you CAN master it! Especially when you realize that you can wet a pointed q-tip and easily correct any jags, taking off a lot of the pressure to make the line perfect on your first try. Liquid liners either come in a tiny container/pot with their own super skinny brushes or are “pens” that write like a felt-tip pen but instead with brush-hair tips. Both versions work beautifully but I would look for a waterproof formula so the liquid won’t feather or run. Watch Lauren’s Get Catty tutorial to see how light-handed you’ll want the pressure to be when you draw the lines.
SMUDGE POT: This little beauty, also known as a gel/cream liner, came on the scene around the mid-90′s as more of a grease paint and has been improving and evolving into formulas that wear for hours and come in an array of colors and finishes (matte and metallic). It usually comes with a little liner brush or you can invest in a longer liner brush that is pointed or angled. Pick this type of liner if you prefer using a brush over a pencil and desire a strong line that isn’t as intense as a liquid liner but more intense than a pencil. Like a liquid liner, I would use it only along the lash line but not inside on the water line because a lot of formulas burn and are for external use only. But once you find a brush that you love (and most likely it will be the one that comes with it!), this super user-friendly type of liner might become your favorite because you can paint on the line with ease and it won’t feather.
XO, Amy Nadine
hair
THE FISHTAIL BRAID
Friends… our videos are back! Hooray!!! First up is the fishtail braid. The hardest thing about doing a fishtail braid on yourself is getting it started. In this video, I’m giving you one of my favorite secret tricks… start with a clear elastic then cut it out at the end. By starting with a clear elastic at the top, you never have to worry about holding 4 confusing pieces together to get your braid going. You can just go straight into it!
Tools: 2 clear elastics, scissors, patience.
Steps:
Xx Kristin Ess
Tools: 2 clear elastics, scissors, patience.
Steps:
- For a smoother braid, brush your hair out first. For a messier braid, leave the natural texture and separate the hair with your fingers.
- Create a ponytail using a clear elastic.
- Split the ponytail into two separate pieces.
- Take a piece from the first side and pass it to the 2nd side.
- Next take a piece from the 2nd side and pass it back to the 1st side.
- Once you’ve finished your braid, go in with your scissors and CAREFULLY cut the clear elastic at the top.
- Optional: gently pull on the pieces to loosen it up if you wish!
Xx Kristin Ess
makeup
WING IT, SISTER
It’s official. On behalf of our girl culture, I think it’s safe to declare that we are all obsessed with the cat eye, most likely because of the way it elongates the eye and creates an illusion that they are farther apart. But did you know that this winged-liner look has three gorgeous step-sisters? It does and I’m happy to walk you through the steps behind each:
- WINGED LASHES: This look can be achieved in two ways, with individual lashes or a lash strip in a winged-shape cut into a third. You can find this strip style at a make-up specialty store, while the individual flare lashes can be found at your local drug store (buy “long” length, or “medium” if your own lashes are on the shorter side). Individual lashes (3 or 4 per eye): One at a time, add a pin-head drop of lash glue to the root of each lash, and place them individually next to each other along the outer corner of your lash line, but INSTEAD of placing each facing forward, place them more at an outward-diagonal direction for the winged effect. (Update: Our video tutorial with Lauren on applying individual lashes is almost finished being edited!) Lash strip: With a ruler or by eyeing it, cut the outer third section of the strip with cuticle scissors then trace along the root of the strip with a thin line of lash glue. Wait two minutes for the glue to get tacky and pop them directly on top of your lash line in the outer corner. **Tip: when applying mascara (always before applying false lashes), drag the mascara wand (thus dragging the lashes) from root to tip in an outward direction (instead of the typical upward direction) for more of a fluttery effect.
- SMOKED WING: This is a softer alternative and can be achieved with any shades (pewter/grey/black/bronze/copper/purple… you name it). Using the same blending techniques that you use when you create a typical smoky eye, start at the inner corner of your crease and sweep the shadow with a blending brush in a rainbow shape along the crease all the way to the area parallel to the end of your brow. Then in windshield-wiping motions, brush the shadow back and forth along the crease while moving in a downward direction along your lid until you reach the lash line. Repeating with another dip in the shadow but always beginning along the crease, sweeping back and forth as your move downwards towards your lashline. Tap off any excess product after each dip into the shadow so particles don’t drop onto your cheeks. Then trace the same shade along your lower lash line, out past your lash line to meet the shadow from your upper lid. **Tip: For a precise angle and winged line, you can first apply scotch tape at the angle from your outer lash line to the end of your brow, apply shadow as directed above, then peel off the tape. (Photo tutorial coming soon!)
- WINGED LID: You know I always have to throw in one for my makeup extremists out there! This look is best achieved with a long-wear gel liner (they come in small pots and almost every brand carries a version now) and a liner brush, because liquid liner isn’t meant to cover this much surface area and will most likely crack (not pretty). Start with a thin winged line along your lash line as if you were only doing a winged liner (watch Lauren perfect it in our Get Catty video tutorial here). Then make another line starting in the inner corner of your crease and tracing it along your crease in a rainbow shape, ending parallel to the end of your brow. Go back to the line along your lashes and extend the wing up to not only meet and connect with the crease line, but extend it a little further (this gives the wing a little “dip”). Then simply fill in the lid area in between the two lines. Hello Drama!!
XO Amy Nadine
tutorials
GUEST POST
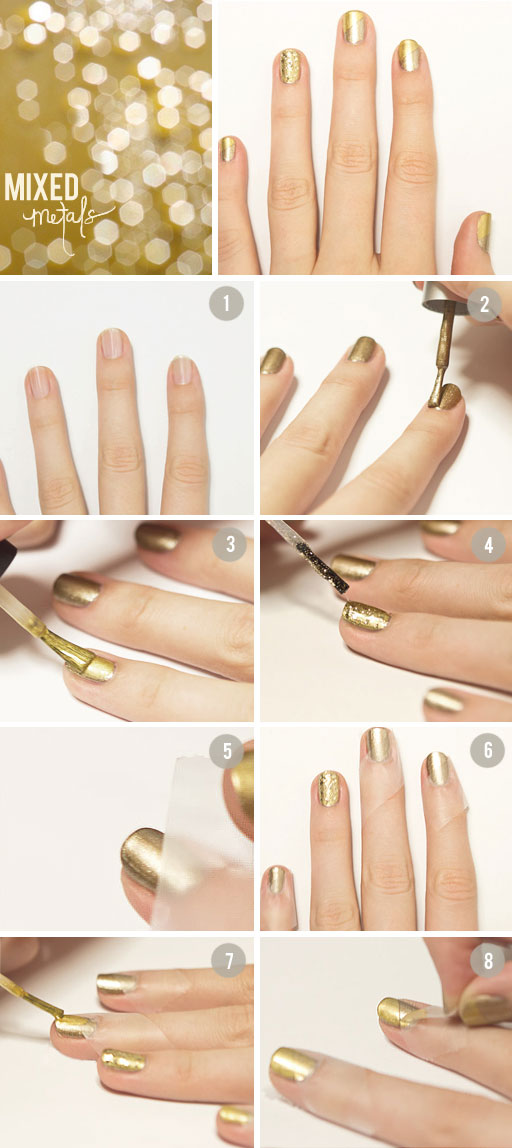
And the winner of our “Nail It” contest is… Jenna Day! We absolutely loved this mixed metals manicure. So, congrats to you Ms. Jenna!! We can’t wait to try this one out for ourselves… and now you guys can too! Thank you to everyone that entered our contest. Going through all of the submissions was really fun and I was very impressed all of your entries.
XO Lauren
MIXED METALS MANI:
TOOLS
Base & Top Coat Nail polish
Dark Gold Nail polish
Light Gold Nail polish
Gold Glitter Nail polish
Tape
STEPS
1. Start with bare nails shaped and ready for your manicure and apply a base coat.
2. Once the base coat has dried, apply 1-2 coats of your darker gold. If it has good coverage just stick with one coat because it will dry faster.
3. On your ring fingers, apply the light gold.
4. Get your glittery gold and apply it on top of the light gold on your ring finger. I like the look of the sparkles on the light gold. It’s totally up to you if you want to keep the darker gold as your base. {Make sure your dark gold nails dry completely before the next step! This can sometimes take up to 30 minutes}
5. Take a piece of tape and put it on your nail at an angle of your choice. It’s easiest to tape all of your nails at once so are not messing around with tape with wet nail polish.
6. Apply the light gold as if you are painting your whole nail. You do not want the paint to be too thick so try to stick to just one coat.
7. Let the paint dry for about 5 minutes and then remove the tape slowly.
8. Apply a top coat and your manicure is complete!!
XO Jenna
hair
GET EXCITED!
Okay, lady bugs! Our video tutorials are back. HOORAY! By far the #1 request in my inbox has been for THE FISHTAIL BRAID! After you watch this tutorial, all of you will know exactly how it’s done. I’m including one very tricky little secret and Lauren’s going to show you how it’s done. Even the most uncoordinated person will be able accomplish this intricate ‘do. That’s a big promise and I’m stickin’ to it. Don’t forget to stop by Friday!
Xx Kristin
Xx Kristin






ليست هناك تعليقات:
إرسال تعليق